
Mike and I got married on July 7, 2012. The day was seriously awesome! I know everyone says that, but we were surrounded by all of our family and friends, the booze was flowing and the music was amazing. How could it NOT be the best night ever?!
Being the thrifty person I am when I got engaged I knew I would try my hardest to keep things affordable and unique. I knew I was going to be a “Budget Bride”. Mike and I are not cookie cutter and we did not want a wedding that was. We planned our wedding as a party that celebrated us. We kept some of the wedding traditions and got rid of others. If we didn’t want to do something, we didn’t do it.
My challenge was to keep things affordable and to craft my face off! Which, if you look at my wedding pictures below you will see I did just that. It was so satisfying to know I had come up with our wedding vision and had executed it on a dime. Seeing everything come together on our wedding day was awesome!
From the very beginning Mike and I knew we wanted to put the bulk of our wedding funds towards our honeymoon. We wanted this to be an amazing bucket list trip, an experience we both would never forget. By doing our wedding on a budget, we were able to do just that. Having saved some serious cash on our wedding, we were able to fly around Thailand (Bangkok, Chiang Mai, Koh Samui, Koh Pha Ngan, and Koh Tao) for 14 days with no budget, which meant 5 star lodging. Our honeymoon cost more than our reception!
Check out all of my wedding CIYs below to see how I was able to pull off a budget friendly wedding!

© 2012 Katherine Murray Photography
These were the two dresses I wore at my wedding. I decided to have two dresses because I knew my wedding day was going to be hot (I wasn’t expecting 102 degrees!) and wanted to be cool for the dancing part of my reception. We had a live band and I knew I was going to dance my butt off. No one wants to see a sweaty bride! ;)
I bought my long dress in New York at RK Bridal. My mom and I took a special trip to NY so I could try on the sample. It was such an awesome trip and I get to feel fancy when I tell people I bought my wedding dress in NY. When I tell you how much I spent on my dress you are going to fall out of your chair. My dress was by Jim Hjlem, but the kicker is…it’s actually a bridesmaid dress that came in ivory! So, my long dress ended up costing me $225.00 (and that’s with shipping!).
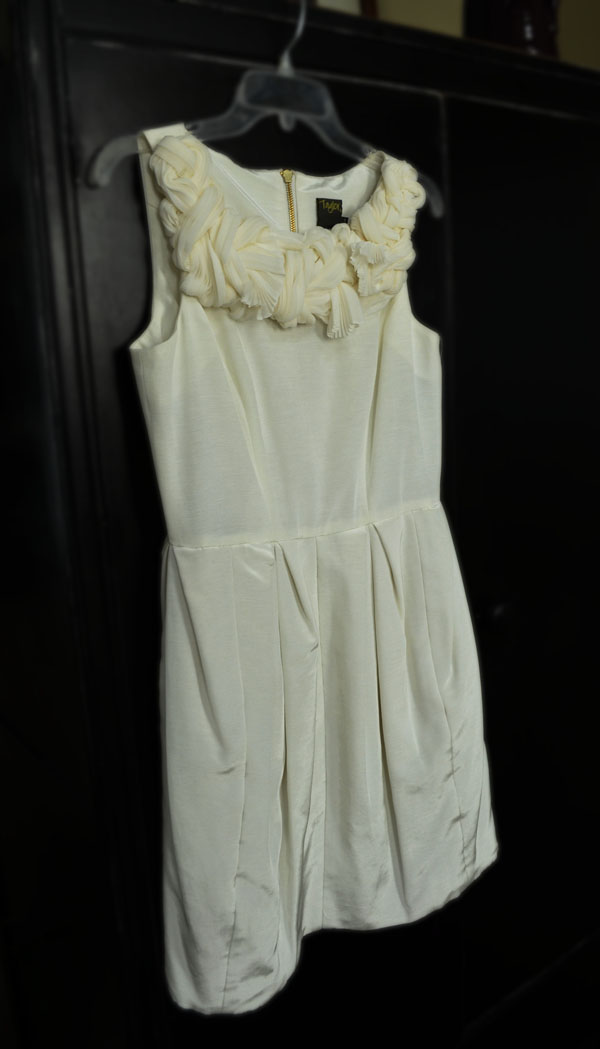
My short dress was from Nordstrom. It was a Taylor Dress. This little number set me back $170.00.
So, my trip to NYC, my long dress, and my short dress ended up costing about $500.00 less than the average bride spends on one dress! Proud of my thriftiness? You bet!

© 2012 Katherine Murray Photography
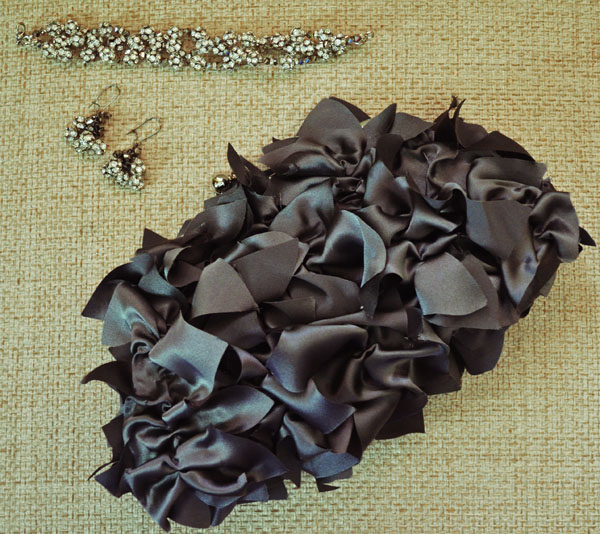
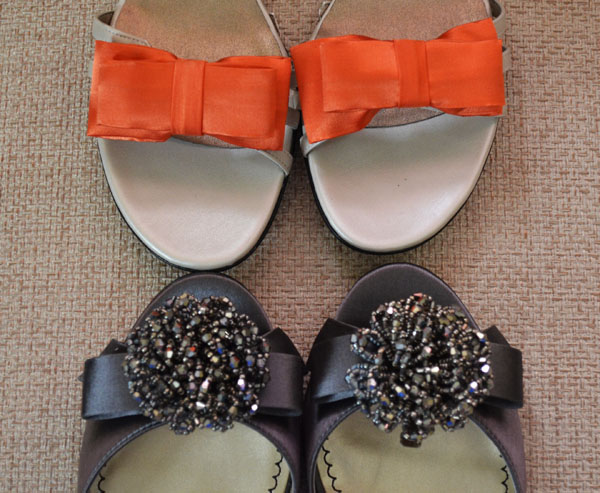
I had two pairs of shoes, one pair for my long dress and another pair for my short dress. I created the jeweled “shoe pops”, as I like to call them. These were actually brooches I bought from a craft store. They matched my gun metal accessory theme perfectly. I took the pin off of the back and glued on an alligator clip so I could clip them to my shoes.
I also refashioned the purse. I bought an ugly white bridal purse from a craft store for $7.00 along with some gray silky fabric. I cut strips of silk and cut out notches so it kind of looked like leaves. I then made a ruffle out of my strips and then glued them to the top of my purse.

© 2012 Katherine Murray Photography

© 2012 Katherine Murray Photography
These were the shoes I wore with my long dress. They were pretty ugly when I bought them. They were on sale for $17.00. I figured if I ruined them from attempting an alteration, no big deal since they were so cheap.
When I got them they had crisscross leather straps over the toes and a strap going from the top of the shoes up to the ankle strap. I cut off some of the toe straps, the middle strap, and the strap that went around the ankle. I bought some orange silk fabric, made a bow, and glued it to the straps over the toes.

© 2012 Katherine Murray Photography
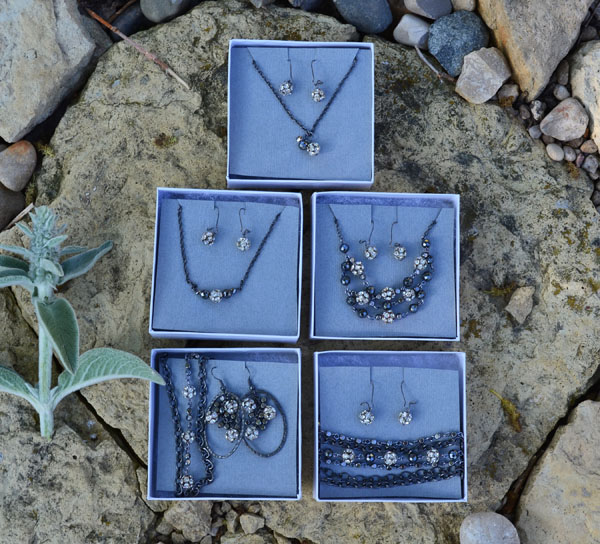
This is the bracelet I wore for my wedding. I made it from beads I ordered from China. I made three strands of beads and just braided them together. This looks like it would be heavy, but it is very light. Like I said, the beads were from China, so they were made out of the cheapest material on Earth. Total cost of bracelet ~$7.00.

© 2012 Katherine Murray Photography
When I made the executive decision to wear my short, bobbed hair up in a crazy teased pompadour, I knew I needed something fancy for the back. I used my gun metal beads and just wire wrapped them making “trees”. I then wired my “trees” onto a hair comb.
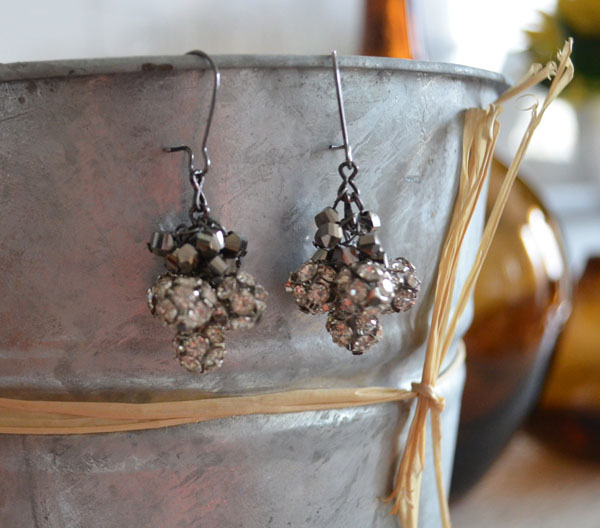
I also made my earrings. I used the same beads from China to make these super easy cluster drop earrings. Once again, they were very light on my ears. :)
I had gone to a couple of local salons for a make-up trial, but was far from pleased with what I got. I wanted to look like the best version of myself, but got a super dark-eyed, unrecognizable me! It was at that point I decided I would do my own make-up. I mean, I was doing everything else, why not add make-up to my list of to-dos?
I went to the Bobbi Brown make-up counter for a free make-up application. I ended up loving the look, and did I mention this was FREE???? I bought all of the make-up that had been used on me. As the months went by I bought up Bobbi Brown brushes to help me master my look. I spent hours watching Bobbi Brown online tutorials and applying and removing false eyelashes. On the day of my wedding I was so relaxed while putting my make-up on because it was now part of my normal routine. I am so happy that I decided to drop around $200 on make-up that I was able to use for months, as opposed to a one-time wedding day make-up application. :)

© 2012 Katherine Murray Photography
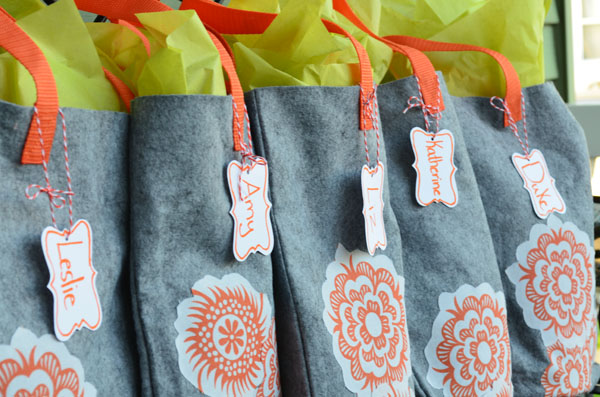
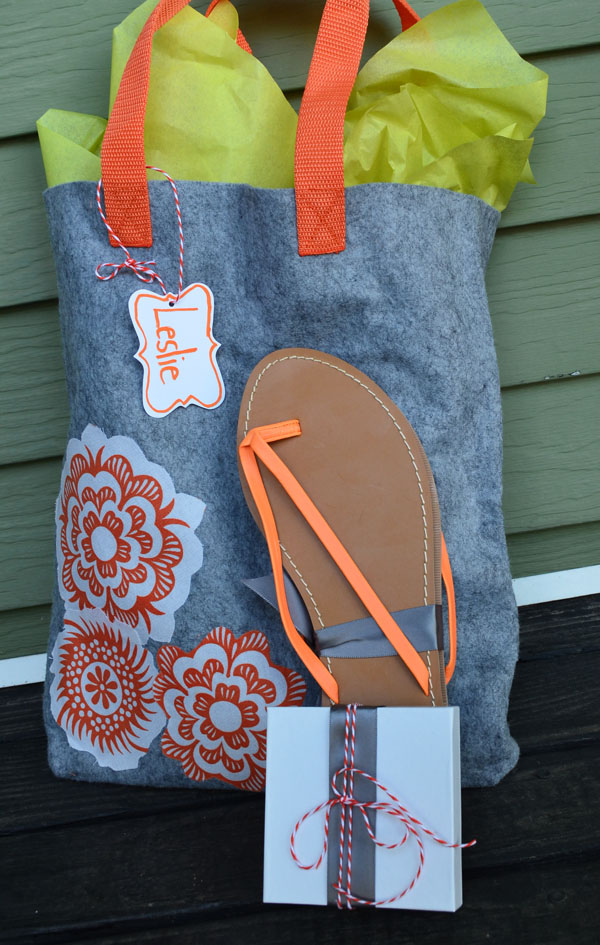
My gift to my bridesmaids was their jewelry (which I made), flips flops (one thing I DID NOT make :D), and tote. I made the tote out of felt. I found cute orange flower fabric that looked like it could be from Anthropologie. I cut out the flowers from the fabric and used wonder under to glue the flower fabric to the felt bags I made.
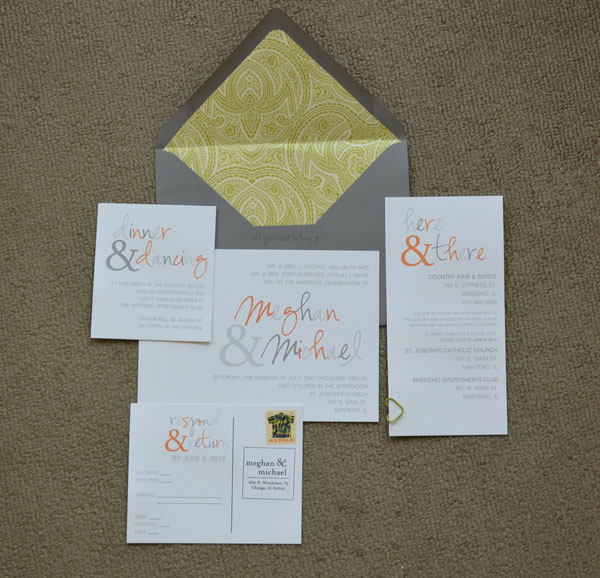
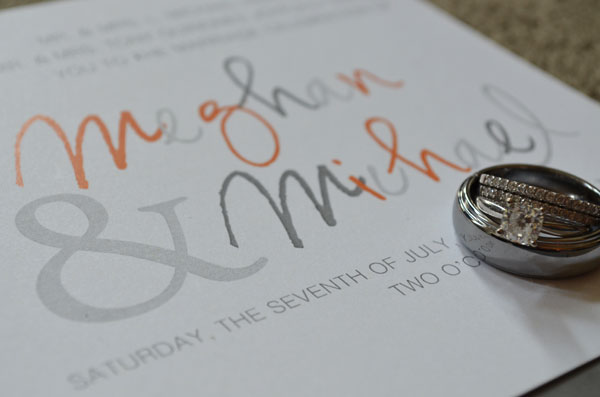
In an effort to keep costs down, I decided to design all of my stationary. What I did was take a 8.5 x 11 sheet of paper and design all of my invitation items from this one sheet of paper. My invitation was 5×7 and the response card was the proper size for a postcard, which meant cheaper postage! I designed and created all of my stationary in publisher. I sent my one page PDF to a printing company who printed and cut my stationary. I bought my envelopes from a store when I was in NY and had a custom stamp made with our return address. Total cost for wedding stationary, postage to send, and return postage: ~$375.00.

© 2012 Katherine Murray Photography
 © 2012 Katherine Murray Photography
I designed and printed my wedding programs as well. I bought my own card stock from a craft store for $2.99 and was able to get 3 programs per page. I cut out each program, folded it in half, and tied a string on it.
 © 2012 Katherine Murray Photography
This is a bridal hanger my mom made for me! She is also VERY crafty and helped with a large portion of my wedding craftiness.
 © 2012 Katherine Murray Photography
I decided the door of the church needed a little pizzaz so I decided to make two “M’s” for “Mike and Meghan”. :) I bought black foamcore from a craft store along with sheets of moss. I cut out my “M’s” and glued the moss to the foamcore and added a ribbon all for about $8.00.

© 2012 Katherine Murray Photography
To dress up the aisle of the church I made paper flower balls. Much more affordable than fresh flowers. I bought styrofoam balls and a ton of tissue paper. I made paper flowers and inserted them into the ball until it was full. I added ribbon and hung them on every other pew in the church. Total cost: $20.

© 2012 Katherine Murray Photography

© 2012 Katherine Murray Photography
We wanted to remember our loved ones who could not be with us at our wedding. I bought 4 clear drinking glasses from the dollar store to act as vases. I bought 4 sheets of vellum paper. I took old vintage pictures of our loved ones, copied them onto paper, and then printed text under the picture. I taped the words under the picture and then copied the image onto the vellum paper. I wrapped the paper around the glass, taped it, and then added a candle. Total cost: $6.00.

© 2012 Katherine Murray Photography
Getting married! ;)

© 2012 Katherine Murray Photography
Married!

© 2012 Katherine Murray Photography
Four “M’s”.

© 2012 Katherine Murray Photography
Our custom koozie was a last-minute addition, like a week before the wedding last-minute addition! I went online and designed them. The quote is one Mike always says when he does a shot with his friends and I thought we should put our names and our wedding date on it to remember the day.
We had these on our bus after the wedding while we took pictures. Beer always makes people happy. These ended up being the best idea ever because it was so freakin’ hot that our beers were majorly sweating. The koozies protected mine and my bridesmaids’ dresses from getting dripped on. I mean, we are classy ladies after all.

© 2012 Katherine Murray Photography
This is the large sign we made to cover up an ugly wall and to thank all of our guests for coming to our wedding. We did not do any favors for our guests because typically a lot of money is put into these and most people don’t take them, and if they do, they throw them away. My gift to my guests was top shelf liquor for 6 hours and pizza at 11:00pm. This is much better than a bell with our names on it! :)

© 2012 Katherine Murray Photography
Large piece of foamcore board used as a seating chart. We added actual frames to give the board some depth and to differentiate between different letters.

© 2012 Katherine Murray Photography
The ceiling where we got married was not cute. I tried to add some visual interest by hanging these yarn balls from the ceiling over our center table. We did three long rows of tables to give our reception more of a family style feel. I made about 30 yarn balls!!!

© 2012 Katherine Murray Photography
I hate carnations. Hate. Hate. Hate. I have honestly never been a fan of the flower. When I was researching flowers and centerpiece ideas I started to realize flowers are EXPENSIVE! I love flowers but was realistic that no one was going to remember my flowers, so why invest a lot of money in them? While I was looking for affordable centerpiece ideas I found carnations bundled together. I actually liked this idea. What, me liking carnations?!? It happened. I placed a bulk order through a local garden center for 500 orange carnations. Total cost: $340.00. My mom and I arranged these in white vases we had collected from thrift stores and spray painted white. Total cost for 35 vases: ~$20.00.
I knew I wanted gray tablecloths and white napkins on my tables. When I looked into renting them I soon found out it would not be cheap. I was quoted over $1000 for what I wanted. My mom was doing research and stumbled upon a website where you could buy tablecloths and napkins at an affordable price. SCORE!!!! I bought 32 gray, floor length tablecloths (that fit 8 foot tables) and 200 white napkins (both were polyester) for the total price of $320.00! The shipping for my order was free. After the wedding I turned around and sold most of the napkins and tablecloths for around ~$150.00. So, my linens ended up costing me (essentially) $170.00. Not bad if you ask me.

© 2012 Katherine Murray Photography
The chairs at our venue were not elegant at all. I knew I did not want to invest in chair covers since people would only be sitting in the chairs for dinner (the dancing part of my reception was outside). I wanted to do something to dress them up without spending a lot of money. I came up with idea of tying ribbon over the tops of the chairs. I paid $45.00 for 3 rolls of ribbon. The sea of orange really popped against my gray table cloths.

© 2012 Katherine Murray Photography
Mike and I knew that even though we weren’t getting married in Chicago we still wanted to incorporate where we live. We had pictures taken around Chicago and at places that were special to us. We displayed these pictures down the center of the tables. The pictures were in old frames we had collected and spray painted white. We removed the backs of the frames because we wanted all of the backs to be white. We covered the backs with white poster board. All of the frames were held up with a fork that was made into a stand.
I also made paper flowers and sprinkled them down the center of the tables to add to the frames and flower pots.

© 2012 Katherine Murray Photography
To add some lighting to the center of the tables, we used homemade votives. Mike collected clear wine and liquor bottles and my uncle cut them down. Total cost: $0.
I made all of the table numbers from card stock and washi tape. And, yes, I did make the white table number holders out of clay. :)

© 2012 Katherine Murray Photography

© 2012 Katherine Murray Photography
Instead of going the traditional route and doing just a three-tiered wedding cake we asked Mike’s mom to make her famous carrot cake for us as our wedding cake. In addition to our cake, my aunts and Mike’s mom made different sweets for our sweets table. The cake stands were made out of white plates stacked on candle sticks that were spray painted white. All of the supplies were bought at the thrift store.

© 2012 Katherine Murray Photography
This was the table for our wedding guest book.

© 2012 Katherine Murray Photography

© 2012 Katherine Murray Photography
I took a wood ampersand and decoupaged black and white pictures of Mike and I to put next to our wedding guest book.

© 2012 Katherine Murray Photography
I wanted a wedding guest book that did not scream “bridal”. So, I got a Chicago photo book and had our guests write their wedding wishes in our book that we now have on our coffee table.

© 2012 Katherine Murray Photography
I knew one of the must haves at my wedding were flip-flips for the ladies. We all know that after a night of dancing our feet start to hurt and a basket full of flip-flops is the best sight ever! I bought about 40 pairs in different sizes from Old Navy in the winter. I got a great deal on them because they were on sale. I put the flip-flops next to the band on the dance floor so the ladies could kick off their heels and throw on some flip-flops without missing precious dance time. Total cost: $42.00.

© 2012 Katherine Murray Photography
The minute I decided my colors were going to be orange and gray my mom starting buying anything and everything orange and gray! I gave my mom a hard time about the orange glow in the dark bracelets, but at the last-minute decided to include them. We even included a sign on how to use them. :) These were a huge hit!

Another hit was the limbo stick! My friends and I are always whipping out the “limbo stick” when we are out. We’ve made a limbo stick out of a scarf and with our arms while holding hands. So, it just made sense that we would have a limbo stick at our wedding. I bought a broom from the dollar store, took the broom head off, and tied ribbon around it. Total cost: $2.00.


© 2012 Katherine Murray Photography
Cocktail hour and dancing were outside on the patio that overlooked the lake. This made two areas I had to decorate! My mom and I got old small popcorn tins, painted them gray, and planted orange marigolds in them. We put these on some of the tables. We put candles on the other tables. We made some orange pillows for a bench, and hung some white paper lights.

© 2012 Katherine Murray Photography
First dance!

© 2012 Katherine Murray Photography
In addition to doing all of my centerpieces, I also did my bouquet, Mike’s boutonniere, the groomsmens’ boutonnieres, my bridesmaids’ bouquets, and flowers for the mothers, fathers, and grandmothers. I bought flowers through a local grocery store. Total cost $150.

© 2012 Katherine Murray Photography

© 2012 Katherine Murray Photography

© 2012 Katherine Murray Photography
To keep things affordable and simple for our bridal party, I let my bridesmaids wear whatever short gray dress they wanted. I also had the guys wear any black suit they had and we provided the ties as part of their gift. I thought everyone looked great. No tux rental here and if you can’t wear your dress again? Don’t blame me!

© 2012 Katherine Murray Photography
I also let my bridesmaids wear whatever style and color of shoe they wanted. I loved the kaleidoscope of color we had!

© 2012 Katherine Murray Photography
Group shot!

© 2012 Katherine Murray Photography

© 2012 Katherine Murray Photography
If you have any questions on how I made any of my wedding CIYs, where I bought materials, etc., or if you need guidance on turning your vision into a reality…Just ask!
January 23, 2013 2:35 pm
Really liked what you had to say in your post, My Wedding – Happiness is…Creating, thanks for the good read!
— Edwin
http://www.terrazoa.com
January 24, 2013 3:58 pm
Thanks for checking out my blog and my wedding page. Glad you enjoyed it. :)
Come back soon!
Meghan
January 27, 2013 1:23 pm
Thanks for sending me the link to your lovely post Meghan! Not at all interested in a huge wedding directed by the wedding industry, so this was a perfect source of inspiration!
January 28, 2013 10:06 am
Thanks for checking out my wedding. Glad I could pass along a little inspiration. :)
January 31, 2013 8:35 pm
Love your new blog, I’m so happy you got it up and running! I just want to emphasize how amazing your wedding was, and of all the weddings I go to, the ones with the personal touches are the best;) and of course thanks for all your help with my wedding, your craftiness and garage was much appreciated!
February 2, 2013 11:53 pm
Thanks, Melisa! I had so much fun helping you with your wedding. :)
February 4, 2013 7:06 pm
I love all your ideas, I may have to borrow a few ;) If you don’t mind me asking; which website did you purchase the Tablecloths from?
February 4, 2013 11:01 pm
Thanks for looking around! I had so much fun trying to come up with different ideas. I am gald I could give you inspiration for your wedding. I bought my tablecloths at http://www.smartyhadaparty.com. Let me know if you have any other wedding CIY questions. ;)
February 5, 2013 6:28 am
Thanks for the link! These were some great ideas!
February 5, 2013 8:54 am
Thanks, Angie. Check back often for more CIY projects. :)
February 8, 2013 4:45 pm
Great wedding! You really had some great ideas that I never thought of before. Your wedding was so classy and intimate becasue you took the time to make everything. It makes a wedding so much better when you do all the personal touches. LOVE,LOVE, LOVE the flip flops!!
I wanted to do everything for my wedding too. But we decided to get married in 9 days so that all our racing friends could come because Racing Season started the week after. I just wanted to get married at home, not some big fancy wedding because it wasn’t my first wedding.
We got married on the first day of Spring. My girlfriends all jumped in to help me, they just did what ever they wanted.I was so excited to finally be get married after waiting 8 years to marry the man of my dreams I just let them do whatever they wanted to do. I knew they all had had nice weddings so I let them do whatever they wanted. My cousin made my cake, my Mom and 3 friends took pictures, a neighbor made all the coursages, bootineers and my bouquets, from silk flowers. I bought some coldcuts, cheese and rolls and everyone brought a dish to the wedding. I borrowed white plastic chairs from everyone, the bells that hung all over were borrowed and they were all pastel colors. One girlfriend planted flowers in the garden that bordered the lawn and the day was just perfect. I found an outfit for my husband-to-be out of our closet and I had him wear his cowboy boots because I knew all the guys would wear theirs – and all but 5, wore boots. My maid of honor took me to buy a dress because she said I needed a new dress. My wedding took nine days to plan and cost $900 for 65 people. We got married in the backyard and I was so pleased that the weather was so beautiful that day, because it rained the next day.
I’m now an ordained minister and I did my first wedding for the best man at out wedding. I love to do weddings and his girlfriend and I did everything ourselves but the food. But this time, I had a year to plan it.
I made her dress, did all the flowers, made the cake, the garter, did her hair, did her daughters dress, and then- I married them. The brides father, who flew in for the wedding, told me afterwards that he could see that he didn’t have to worry about his daughter anymore. He told me that I was her mother now and that I did a great job on the wedding. That was one of the nicest things he could have told me.
And when it was all done, I really did get the wedding I always wanted but I did it the daughter I always wanted, and she got a mom for her wedding, something she didn’t have.
Now her daughter is getting married. She calls me gramma and she wants me to marry them, and I’m so excited. You gave me some great ideas for her wedding. Thank-you so much for letting me see your big day and sharing your ideas. It was just wonderful.
Sorry if I went a little long. You just made me want to share.
February 10, 2013 9:45 am
Thanks for sharing. It sounds like you were on the same page as me – do as much as you can yourself. :)
February 20, 2013 10:24 pm
Love, love, love your blog! So nice to see the crafty things people do on a budget that look AMAZING!
I was wondering how your Mum made the hanger? I have a friend getting married and it seems like such a nice gift!
February 21, 2013 10:38 am
Thanks, Annabelle! I had a blast making everything for my wedding. For the hanger, my mom bought a wood hanger and drilled two holes – one at each end of the hanger. She purchased a thicker floral wire from a craft store. The wire she purchased was thick, but very easy to bend. She then took the wire and bent it into my new last name. :) Hope this helps! Let me know if you have any other questions. If all this fails, let me know. My mom also sells these.
March 27, 2013 8:12 am
Such beautiful photos and moments!!! I love the colors and your dress. Congratulations to you and your new husband!
xo, Courtney
girlavantgarde.com
March 27, 2013 9:32 am
Thanks, Courtney! Can’t believe we are coming up to one year. :)
April 10, 2013 9:59 am
Wow, what a beautiful wedding!!! Thank you so much for sharing. I enjoyed the beautiful photos and the descriptions of how you did everything. You are amazing!!! My son is getting married in August and my FDIL- future daughter in law, who is also amazing, is thinking of doing some of the jewelry. We were wondering if you have the name of where you ordered the jewelry supplies.
April 10, 2013 11:41 am
Thanks, Toni! I had so much fun designing and creating all of our wedding elements.
I bought the round rhinestone beads from Pandahall.com http://www.pandahall.com/ProductSearch?keyword=RB-H034-18-1
For my bracelet – http://www.firemountaingems.com/itemdetails/H201549BS
For my bracelet – http://www.firemountaingems.com/itemdetails/H205934FN
For my bracelet – http://www.firemountaingems.com/itemdetails/H204050FY
The small rounded square gunmetal beads – http://www.firemountaingems.com/itemdetails/H202018BB
For the large earrings – http://www.firemountaingems.com/itemdetails/H207859FX
For all of the earrings – http://www.firemountaingems.com/itemdetails/H209500FX
I bought the larger round faceted gunmetal beads, the thin gunmetal chain, the gunmetal headpins, and the gunmetal hook earwires from Joanns.
Hope this helps!
April 30, 2013 8:52 pm
Its so awesome that you were able to create all this which totally made your wedding so personalized. I am beyond amazed and inspired. You are a true creator. wish you the best in your marriage and more CIYing.
Sophie
http://sophiamusoki.wordpress.com/
May 3, 2013 9:27 am
Thanks, Sophie!
It really was fun seeing my vision come to life.
May 10, 2013 2:43 pm
This was AMAZING!! Great ideas, all beautiful. It was truly about you and your husband and the simple meaningful things. Such creativity!
May 10, 2013 3:50 pm
Thanks for the comment and stopping by, Corina.
June 4, 2013 10:20 am
gorgeous pics!!! love the orange accent
Pingback: {Porch Redo} Project:2 - Outddor Candle Holders - Happiness is...Creating
June 24, 2013 4:05 pm
Thank you for sharing your beautiful wedding! I love your ideas! Where did you have your reception? I live in Chicago and am planning our wedding for next year. I too, want to save as much as possible on the reception, while still having a great party and save our money for the honeymoon.
Thanks!
June 25, 2013 9:02 am
Thanks, Missy!
It was so much fun planning!
We got married at the Mateno Sportsmen’s Club in Manteno, IL (http://www.mantenosportsmensclub.org/generic.aspx?PageType=_598_7737). It is about 45min-1 south of Chicago. Kristina LaMore is awesome. She was extremely felxible and open to all of my ideas. We rented the patio and the hall (it was SUPER cheap <$400!) The Country Inn and Suites is where I had my hotel room block. It was a nice cute little hotel. Since the town is small, it is very charming with a little downtown area. Let me know if you have any other questions!
June 25, 2013 7:42 pm
Thank you for sharing this post! Everything is beautiful! I’m trying to order flowers cheap and do them myself too! I have a couple questions if you don’t mind.. Are those Hypericum Berries in your bouquets? What is the little green sprig in the boutonnieres? And what grocery store did you go to?
June 27, 2013 11:51 am
Thanks for stopping by, Lauren!
Yes, the small berry looking flowers are hypercium. I am pretty sure the green/yellow sprig was goldenrod. I went to Jewel/Osco. I was able to place my order through them. It was way cheaper than a florist. Let me know if you have any other questions!
July 14, 2013 10:52 pm
I am so glad I found your wedding blog–thank you so much for posting SO much detail! I am getting married Sept 2014 and plan on stealing more than a few ideas from you–all my crafting is on hold for the summer but the jewelry in particular is on my “To Do During Awful Iowa Winter Ice Storms” list so please don’t take it down! :)
I’ve never made jewelry before–aside from the wire and beads, what supplies did you need? I’m assuming at least a needle nose pliers for pinching off the wire ends? Thanks and belated congrats!
July 16, 2013 10:06 pm
Thanks, Coby :)
This has everything you would need in addition to the beads and wire. http://www.joann.com/jewelry-basics-starter-pack-145-pk-silver/zprd_11372976a/
You could get away with pliers, but if you want this is awesome. It has everything you need http://www.joann.com/jewelry-5-piece-beading-pliers-set/prd35287/
Let me know if you have any other questions!
Meghan
September 10, 2013 9:47 am
So I bought the supplies and sat down the other day to try to make the earrings you made for yourself, and I’m having a hard time seeing in detail exactly how you made them. Now, it’s possible that I’m just hopeless at crafts, but before I give up I wanted to see if you had any close up pics of when you were making the jewelry, or maybe some kind of instructions? Thanks!
September 11, 2013 8:42 pm
Hi Coby!
You can totally make them!
First, you will need about 1 inch of small linked chain per earring.
Open up the loop on the bottom of your earwire. Slide your chain onto the loop, then close your chain.
Take one of your larger beads and put a head through it. Trim the headpin down and curve the wire over forming a loop. D not completely close the loop. Put the open loop through the last chain link and close.
Next. you will put headpins through 4 more of your larger beads. Repeating the above step with all of the, stop before you close the loops. Take one of your beads and put it through a chain link above your last bead. You will need to play around with which link to put your bead on to make sure you like where it lays. Once you found the right link, close the loop of your headpin securing your bead to your chain. Then, put your 3 remaining beads on the same chain link. They should fan out like my earrings.
If you think your chain is looking a bit long with the addition of the bottom bead, you can always remove a link or two until it is the length you want.
Next, grab one of your smalls beads and one of your headpins. Put your headpin through the bottom of your bead. Trim the wire, leaving enough room to make a loop. Leave the loop open a bit. Attach the loop to the chain. Repeat this will your small beads filling in the links at the top of your chain. I probably used 10 or 12.
Let me know if you still have any questions!
Meghan
August 1, 2013 11:39 am
awesome. everything looks incredible. great job! i’m planning for next summer on a super budget and my DIY list is…long. very long. (like, make all the flowers, make the dress, make the bridesmaid dresses, design the invitations, etc…bc i’m crazy. heh.)
August 5, 2013 9:45 am
You sound just like me. :) If you give yourself enough time and keep everything as simple as possible, it is totally doable.
August 29, 2013 1:16 pm
I love your ideas and thriftiness! My daughter will be married in a month and wants me to make your idea for the Memory Candles. I purchased vellum and have the photos, but are stuck from that point. Is there a link or suggestions you could make?
Thanks! Lorie
August 30, 2013 9:23 pm
Thanks, Lorie!
Congrats to your daughter. :)
I included some instructions below. Please let me know if you have any other questions!
Meghan
First, if your picture is too big, you will want to shirk it. I did this on a copy machine. I used the reduce option. Open a word doc, pick your font, and write out your message (I centered my message). Go to page set-up and turn the page layout to Landscape. Space your message down towards the bottom of your paper. Print off your message. Next, Take your photo and tape it above your message. Make a photo copy. Them wrap it around your glass to make sure you like the way it looks. If you like the way it looks, place your vellum in the copier and then copy. After you copy your pic and message wrap it around your glass and tape it together in the back.
If you don’t have a copy machine, but have a scanner, you scan your picture. Open a word doc, go to page set-up and turn the page layout to Landscape, then copy and paste your scanned pictured into your doc. Center your picture. Pick your font, and write out your message (I centered my message under my picture). Then, print off your memory pic and message. Wrap it around your glass to see if you like it. It you like the way it looks, place your vellum in your printer and then print. After you copy your pic and message, wrap it around your glass and tape it together in the back.
October 14, 2013 5:13 pm
Hey Megan! John and I sat next to you at Scott and Jill’s wedding. Thanks for sharing this site with me. Love it! You are my type of wedding girl. I might contact you sometime in the future for some “Cheap” ideas.
Amy :)
October 16, 2013 7:50 am
It was great meeting you! Thanks for checking out my blog. When the “time comes”, you let me know. I love coming up with fun wedding ideas. :)
October 29, 2013 10:09 am
WOW! I really wish I had seen this before I got married 3 years ago :) I just rushed and decided I didn’t have time to DIY…but now I know it is possible! Well done on a beautiful wedding!
January 25, 2014 10:41 pm
My fiance and I are broke, well, we have jobs but we don’t have all the money I wish we could for the wedding, as far as decorations, did you have help with everything, and which area is the best to go low budget in?
January 26, 2014 3:13 pm
My mom was a HUGE help! Her and I basically did everything. Luckily we are both crafty, so that really helped. One of my aunts loves going to garage sales and estate sales, so I gave her a list of things I wanted. When she saw them, she grabbed them for me. As for my sweet table, my mother-in-law and two of my aunts made everything.
It really depends on what is important to you and your fiance. My husband and I wanted everyone to have a blast at our wedding. Since that was most important to us, we spent more money on having good alcohol (for a long period of time) and a live band. I wanted my wedding to look nice, but I knew the reality of it was if I had spent a ton of money on the decorations, the venue, the alcohol, a dj/band, and food most people would still only remember if they had a good time. That’s why I didn’t pump a ton of money into my decorations. I knew no one was going to notice all of the detail I had put into them, so at least I didn’t spend a ton of money on them.
I love flowers, but I knew they would just go to waste after the wedding. By doing my own simple flower arrangements (and the flowers for my bridal party) I saved thousands of dollars! I know brides spend on average between $2,000-$5000 (if not more!) If you can figure this out for your wedding you could use the savings on your decorations and other things that might be more important to you.
So, just decide what is most important to you and your fiance and focus on that. Hope this helps! :)
January 26, 2014 4:24 pm
Did you make your own bouquets and such? My mom is growing zinnias for the reception tables, but we’re stuck on how to do the bouquets. Just wondering how you solved that one. Thanks!
January 27, 2014 9:01 pm
I did do my own bouquets and boutonnieres. I purchased all of the flowers from the floral shop at a local grocery store. Not sure where you are located, but I bought them through Jewel. As far as arranging them, i pretty much just clumped flowers together with some fillers, wrapped them in orange ribbon (I watched a video on YouTube), and pushed pearl head pins down the handle. I did the same thing for the boutonnieres. Once I had my boutonnieres the way I wanted them, I wrapped them in green floral tape. Honestly, I think if you just cut a bunch of flowers and tied them together with a piece of raffia or ribbon, they would be lovely. Once again, people are focusing on you, not your flowers. ;) Hope that helps! Let me know if you have any other questions.
April 19, 2014 1:20 am
Love your ideas and photos…. how did you do the yarn balls?? Getting married in June and doing a very small intimate and inexpensive reception that I think those would be great at lol.
April 21, 2014 1:37 pm
For the balls, I used:
– Flour
– Water
– Glue
– Yarn
– Punching Balloons
-I added water to a bowl of water and dumped in some flour. I didn’t measure, but made sure my glue was not too watery or too thick. I also added some elmer’s glue just for some more stiffness!
– Unravel your yarn and create a yarn ball the size of a baseball.
-Blow up your balloon to the size you want your yarn ball to be.
-Put your ball of yarn into your “glue”. Give it a good squeeze so it is nice and saturated. You will keep your ball of yarn in your glue as you wrap your balloon.
– Tie a very loose knot around the end of your balloon (this will keep your string on your ballon). Begin wrapping your yarn in all directions, filling in gaps as you see them. You will keep wrapping until you get your desired look. Let your yarn dry. I hung my balls from the rubberband that comes with the punching balloons!
– Once your yarn is nice and dry (and stiff) use a straight pin to pop your balloon. I recommend making and popping your balloons outside. This is a SUPER messy DIY!
Let me know if you have any other questions!
Best,
Megan
April 21, 2014 1:53 pm
Hi meghan
I loved your CIY wedding!! I wanted to know how much did you spend on photography?
April 21, 2014 9:25 pm
Our photography ended up costing $900.00. Our photographer was new to the area and was trying to get her name out in the area. So, we lucked out and got a great deal!
May 9, 2014 3:47 pm
Your tables look elegant! Would love to know the website where you ordered the linens.
May 9, 2014 4:01 pm
Approximately how many stems of carnations are in each arrangement? how many arrangments did yyou amke the with 500 stems you purchased?
May 13, 2014 7:51 am
I did 10 stems per vase. I believe I had 40 vases I filled. So, it was less than 500 flowers, but I did order a few extra in case I broke any!
May 17, 2014 3:42 pm
Omg, you’re officially my hero! You have read my mind in almost every way.
Congrats on your über fabulous wedding, and I hope your recent 1 year anniversary was everything you hoped for.
I’m now inspired to plan my own.
I especially liked the paper flower balls used in the church. How did you make them?
May 18, 2014 7:11 pm
Thanks for the kind words, Kadian. It’s crazy that we are coming up to our 2 year anniversary! Time flies when you are having fun. :)
I am glad I have inspired you to DIY your own wedding. It is a lot of work, but so rewarding!
You can see how I made the flower balls here: http://happinessiscreating.com/ciy-paper-pomander/
Let me know if you have any other questions!
Meghan
May 27, 2014 4:37 pm
Megan- what beautiful ideas! How did you do the names in white on the black board for table location?
May 27, 2014 4:45 pm
Thanks, Rebecca!
I had a large piece of foam core cut. The piece was huge, like 3 feet by 4 feet. My Mom used a pencil and a yard stick to very lightly draw straight lines across the board that were an inch apart. After she had her lines, she figured out how many last names began with each letter. Once she had that she grouped letters together and added the frames (she glued the frames directly to the board). She wrote every name and table number with a white chalk marker. Hope this helps!
Meghan
July 26, 2014 11:50 pm
Megan your awesome .. your article is so helpful … planning ones wedding can be so overwhelming, thanks for the inspiration :)
July 28, 2014 9:46 am
Thanks, Melissa! Wedding planning can definitely bring on stress! While planning my own wedding I tried to stay relatively calm because the most important thing was I was getting married. All that really mattered was both my husband and I making it to the alter. Everything else was just details. :)
February 19, 2015 3:41 pm
My goodness I LOVE the purse you DIYed! Do you have a tutorial up on your blog?
xo Rachel
Pingback: Wedding Reception Homemade Decorations | Wedding Decoration
Pingback: Cheapest Wedding Flowers In January | ratings - national florist index
January 28, 2016 9:09 am
Love all of these! I was wondering if you would be able to elaborate on how you applied the moss sheets to the foam boards. I am trying something similar and having a lot of difficulty.
January 29, 2016 9:28 am
Thanks, Jill! Since the moss sheet had a paper liner on the back, all I did was add some hot glue to the back and glued it to my foamcore board. You could also use a spray adhesive (looking back, this is probably the better option. ;D). Please let me know if you have any other questions!
March 21, 2017 9:25 pm
Hot diggity Meghan, where do you get such good ideas? Your wedding entry was amazing, full of great ideas and tips for almost any special event. I’m in Chicago, so I’m familiar with some of the geographical references you made, (Jewel grocers for flowers, yes!), but I’m sure most of the tips can be duplicated almost anywhere. With thoughtful planning and help from some (generous) friends and family, a lovely event like yours and Mike’s is possible.
Just found your site, but I’ll be back. Keep creating!!
March 27, 2017 12:14 pm
Thanks for checking out my blog, Nina! I found a ton of inspiration on Pinterest and other bloggers. I need to get back into my blog. It has been very silent since having my twins. They turn one this week. :)
Pingback: I'm Back! - Happiness is...Creating
November 21, 2018 2:05 pm
Me encantan todas las ideas, sobre todo las gorras que puedes personalizar para las damas de honor y para los padrinos.
Pingback: DIY Hexagon Halloween Sign - Happiness is...Creating