Home

Feb 09, 2018 | Post by: Meghan No Comments

DIY Heart and Tassel Garland

I’ve really gotten into the Valentine’s Day decorating spirit. My shelves in my living room are all decked out in red and pink to welcome the day of love.  Most of the projects I did this year were created from my Cricut machine. To say that I am obsessed with this guy would be an understatement!  (more…)

Jan 19, 2018 | Post by: Meghan No Comments

DIY Pom Pom Heart Pillow

Valentine’s Day decor means heart, hearts, and MORE hearts!  So, I decided to make a decorative heart pillow for my living room.  I, of course, had to add pom poms to my pillow.  They really add a the finishing touches to this DIY Pom Pom Heart Pillow!

Supplies:

  • Red Cotton Fabric
  • Pink Pom Pom Trim
  • Scissors
  • Needle and Thread (or a sewing machine)
  • Scissors
  • Batting

Lay your fabric down so it is double-sided.  Cut out a heart shape.  You’ll be left with two identical hearts.

Pin your trim to the inside of your heart (the pom poms will be facing inward).  Then, pin your other heart piece on top.  Sew around the outside of your pillow, making sure to stay close to the edge so your sewing machine sews the trim to the heart.  Leave an opening at the bottom of your heart about 3 inches long.  After you sew your pillow, flip it right side out.  Press it with an iron.  Then, stuff it with batting and sew up the opening you left.

Jan 17, 2018 | Post by: Meghan 2 Comments

3-D XO Valentine’s Day Decor

Add some love to your home this Valentine’s Day season with this super easy 3-D Valentine’s Day Decor!

This festive little gem was made out of paper, popsicle sticks, and foam squares!  You don’t have to stick with the X and O like I did.  You can use this technique to give all sorts of shapes dimension!

Supplies:

  • Red Cardstock
  • Glitter Paper
  • Foam Squares
  • 2 Popsicle Sticks
  • Cricut Cutting Machine
  • Hot Glue Gun
  • Scissors

First, cut out 3 X’s from your red cardstock and 1 X from your gold glitter paper.  Add foam squares to the fronts of the red X’s.

Next, place the red X’s on top of one another.  The gold X will be the last one you add.

Cut a piece of your popsicle stick so its about 2.5 inches.  Cut two pieces of popsicle stick about 1.25 inches.  After you cut all of your wood pieces, trace them over your glitter paper.  Glue pieces of glitter paper on all sides of your wood pieces with your hot glue gun.

Glue the popsicle sticks on the bottom of your X and O.

Jan 15, 2018 | Post by: Meghan 4 Comments

XO Vinyl Valentine’s Day Pillow

Now that I have kids I am all about decorating for the holidays.  For me, it all started with Halloween this year.  I even made the small transition from bats and scary pumpkin faces to Fall decor like leaves and plaid pumpkins.  I definitely kicked it up a notch when Christmas rolled around with wood slice ornaments and a cute little pipe cleaner tree.

IMG_4079

When Christmas made it’s official exit (in my house it’s January 1st or 2nd), I was kinda bummed.  I knew Valentine’s day was next up on the list of holidays and I wasn’t feeling as excited to transform my living room shelves.  Until, I got a Cricut for Christmas.  I’m pretty much obsessed with it and have created so many Valentine’s Day projects, starting with this XO Vinyl Valentine’s Day Pillow.  (more…)

Jan 03, 2018 | Post by: Meghan 2 Comments

Easily Create Gorgeous Custom Wedding Invitations

Disclaimer – This post is sponsored by Basic Invite. Basic Invite is an online stationery company providing wedding invitations, birth announcements, graduation announcements, and quality stationery for all of life’s moments.  All opinions are 100% my own. 

When I got engaged, I knew I would be very hands-on with my wedding. I wanted to DIY any aspect of it I could to keep my costs down and customize it to fit the style of my husband and I. Like most brides, I added custom details to my wedding by making my own jewelry and adding special DIY touches to my centerpieces.

One DIY area most brides won’t attempt is their stationery, specifically their invitations. They assume they need to know graphic design to take on a task like designing custom invitations.  I ended up making my own invitations for my wedding. Since I don’t have a degree in graphic design, I kept the style of my invitations super simple with just basic font mixing. They turned out fine, but they were very simple and took a ton of time to make.

I recently found out about Basic Invite. Man, where was this place when I was planning and DIYing my wedding?!?! Their website is serious eye candy for any bride-to-be looking to design custom wedding invitations. Had I known about Basic Invite when I was creating my wedding invites (and stationery) the look and feel of them would have been way more professional with pretty details and the process of creating them myself would have taken way less time. As a bride-to-be saving time is a must since you are juggling a million to-dos at once!

basic_invite_34

Now that I know about Basic Invite, I want to help all of you brides out there by sharing the details of this amazing online stationery shop and how you can create your own gorgeous wedding stationery. Yep, it can be done and you can do it yourself! Here are some of the details of what Basic Invite provides so you can make your wedding stationery affordable and gorgeous!

They have (almost) unlimited colors. Different websites offer custom color options, but at Basic Invite they allow their customers almost unlimited color options with instant previews online. Yep, go ahead and choose that mossy green you love (that has a hint of grey in it and probably only exist is nature) because it can be added to your wedding stationery! Another element that makes Basic Invite different from other online stationery companies is the amount of customization they allow their customers. Once a design has been selected, the color of the elements can be changed. There are over 180 different color options to choose from. This allows customers to truly create a card that is exactly what they want!

basic_invite_78.JPG

You can order custom samples. Basic Invite is one of the few online stationery companies that allows customers the ability to order a printed sample of their actual invitation so they can see exactly how it will print and get a feel for the paper quality before they place their final order. You guys, this is amazing. You get to see the invitation you created (in the flesh) before you order 200+ of them. This saves so many headaches of ordering your invitations (without seeing them) and praying they are exactly what you want. You have enough on your plate to stress about as bride; this service will take the worry of your custom invitations off that very full plate.

They have over 800 wedding invitation sets to choose from. That’s right 800+ options of cute wedding invitations for you to choose from until you find the design that fits your style! They just rolled out their new clear collection, added rose gold to their foil line, and introduced foil place cards. You really can’t go wrong with foil details and the clear invites are beautiful!

Box Three

Each of their wedding invitations is part of a set, which means you can find everything from save the dates to wedding invitations and enclosure cards, wedding menus, wedding programs and thank you cards. Not only can you get all of your wedding stationery with one click, but it will all match. Best.News.Ever.

basic_invite_wed_program1

Once you’ve selected your fun wedding invitations, it’s time to keep the cute going with over 40 different colors of envelopes. You don’t want to send your guests an invitation in a plain white envelope do you? The answer is “No”. Basic Invite is just as colorful with their envelopes as they are with their invitations. You get to choose from over 40 different colors so you can make your invitation stand out even before it is opened! Oh, and you don’t have to worry about licking yucky glue to seal these bad boys. Nope. All of their envelopes are peel and seal so they can be quickly and securely closed. Winning!

Another feature Basic Invite offers is a free address collection service.  They’ve made one of the more unpleasant tasks of sending out invitations super easy. You can use their free address collection service to request your addresses with just three simple steps. Share a link, collect addresses, and get free envelope printing.  It’s as easy as that! Having the ability to pick out your wedding invitation design and customize it to fit your style is super amazing, but this feature comes pretty darn close to matching that level of excitement!

You can also add a gorgeous keepsake guest book to your big day. Basic Invite allows you to personalize a wedding guest book that is the perfect addition to your wedding day stationery. These customizable guest books have a ring hidden inside which allows them to lay perfectly flat for a classy and convenient look. Since your guest book will have sweet words and well-wishes, you’ll want this to be beautiful so you can display it for years to come.

basic_invite_53.jpg

Man, everything Basic Invites offers makes me want to get married all over again just so I can make the most gorgeous wedding stationery ever! The good news is you now know about this awesome online stationery so you can make your wedding invitations and stationery chic and fabulous.  If you’re like me and have already done the wedding dance, you can still get super cute stationery from Basic Invite. They have customizable invitations for birthdays, showers, baptisms, and so much more! Basic Invite will be your go-to stationery shop starting with your wedding and beyond!

shower.png

If you are looking for more stationery inspiration, be sure to check Basic Invite out on Facebook, Pinterest , Instagram, and Twitter.

Dec 21, 2017 | Post by: Meghan No Comments

DIY Felt Evergreen Branch

This DIY felt evergreen branch is just what you need for your holiday decor this year. It’s a no-maintenance way to add festive holiday greenery to your home or office!

Christmas is in full effect at my house. I’ve been decorating my tree and adding some festive charm to my shelves.  As I was going through my Christmas storage box looking at all of the decorations I have I was feeling pretty underwhelmed.  I felt like I was in need of some fresh, modern decor to add to the mix.

I love the look of Evergreen trees, but didn’t want to run out and get some fresh Douglas Fir branches cut since my kiddos are still tempted every once in a while to put random things they find on the floor in their mouths.  So, I wanted to get the look of a fir, but without the risk of having it shed all over my floor.  I figured out a way to get the look of a Douglas Fir branch using felt! This project is super simple.  So simple you can complete it in about 10 minutes! See the full tutorial at diys.com.

Dec 20, 2017 | Post by: Meghan No Comments

DIY Rustic Woodslice Photo Ornament

Showcase your favorite photos with this DIY Wood Slice Ornament.  Use it to display your favorite photos from the year or visits with Santa. It’ll make a great addition to your Christmas tree!

Now that I have kids, an annual trip to see Santa has become a Christmas tradition.   Last year was their first year with Santa, and surprisingly, there were no tears.  I thought for sure our visit with Santa this year would bring tears from someone since the kids are a little older and more aware of their surroundings.  Once again, no tears.  So, we are two for two!

IMG_3682

I now have four pictures of Santa – two from last year and two from this year. I figured I would do something with these photos instead of just tossing them into our Christmas storage box.  I decided to transform them into into a DIY Wood Slice Ornament.  My goal is to create these ornaments every year.  That is, until my kids no longer have any interest in visiting Santa! See the full tutorial at diys.com!

Dec 18, 2017 | Post by: Meghan No Comments

A Quick Tree Skirt Makeover

I have had my Christmas tree skirt for probably over 10 years.  No, seriously.  It’s so funny because I bought this tree skirt from the Dollar Store a million years ago when I bought my tree (which is also in need of being replaced!).  It was the perfect size for my short and skinny tree.

IMG_3774

I wanted to give my tree skirt a mini makeover to get us through one more Christmas before I retire both the tree and skirt and upgrade to a real tree and a more substantial tree skirt.  My mini makeover only took 5 minutes!  All I did was glue pom pom trim around the outside of my skirt to instantly transform it into a sweet and chic skirt.  Now I’m thinking I may need to hold on this shirt is I decided to add a smaller tree to my house next year!

Supplies:

  • Tree Skirt
  • White Pom Pom Trim
  • Hot Glue Gun

IMG_3760

Step 1: Measure around your tree skirt to get the exact length.  You want to make sure you get enough trim to go around your skirt.  I got my trim from Michael’s.

Step 2: Add glue to the top of your trim and add it the underside of your skirt.  Continue making your way around your skirt until the entire thing is covered in adorable pom poms!

IMG_3762

Dec 15, 2017 | Post by: Meghan 3 Comments

DIY Pipe Cleaner Christmas Tree

Pipe cleaners aren’t just for kids!  You can take these sweet fuzzy sticks and turn them into a chic little white tree perfect for Christmas.

IMG_3732

Now that I am decorating my shelves for every holiday, I wanted to create a simple tree to add some height to my Christmas decor.  When I recently cleaning out my craft room, I found a bag with white pipe cleans, a dowel rod, and a wooden square block.  Clearly I had been planning on making a tree in the past!  Man, I need to do inventory checks on my craft supplies!  At least I found this before I went and re-bought all of the supplies I already had.  I know we have all been there at some point in our crafty lives!

After I made my tree I wanted to add some ornaments to it so it had a pop of color.  I used small red pom-poms and jewelry eye pins.  These ornaments are the sweetest! The full tutorial is below.
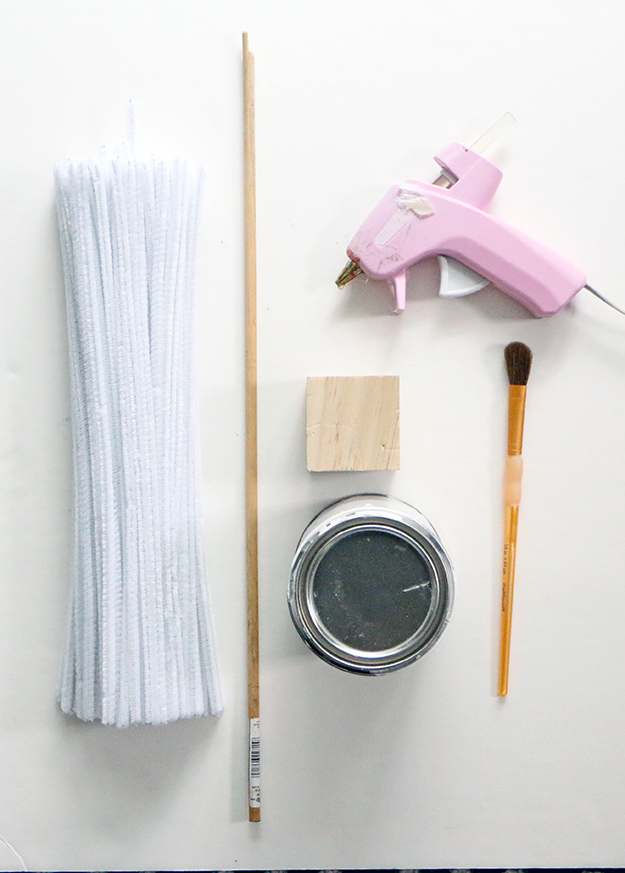
Supplies:

  • Wooden Square Block
  • Wooden Dowel Rod
  • White Pipe Cleaners
  • White Paint and Paint Brush
  • Hot Glue Gun
  • Scissors

Optional:

  • Small Red Pom Poms
  • Jewelry Eye Pins
  • Pliers

IMG_3460

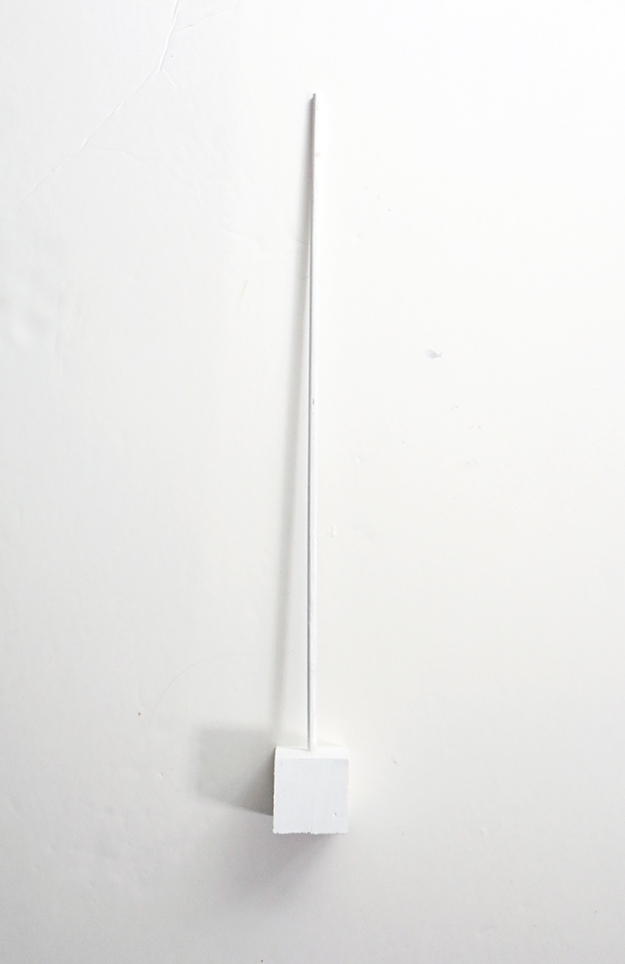
Step 1: Drill a hole in the center of your block.  Paint your block and dowel rod white.  Once dry, add your rod to the hole in your block.

IMG_3469

Step 2: Add a bit of hot glue to the bottom of your rod and start wrapping a pipe cleaner around the bottom.  Then, fold a pipe cleaner in half and twist it around the rod.  Once twisted, push it down towards the bottom of the rod.

IMG_3474

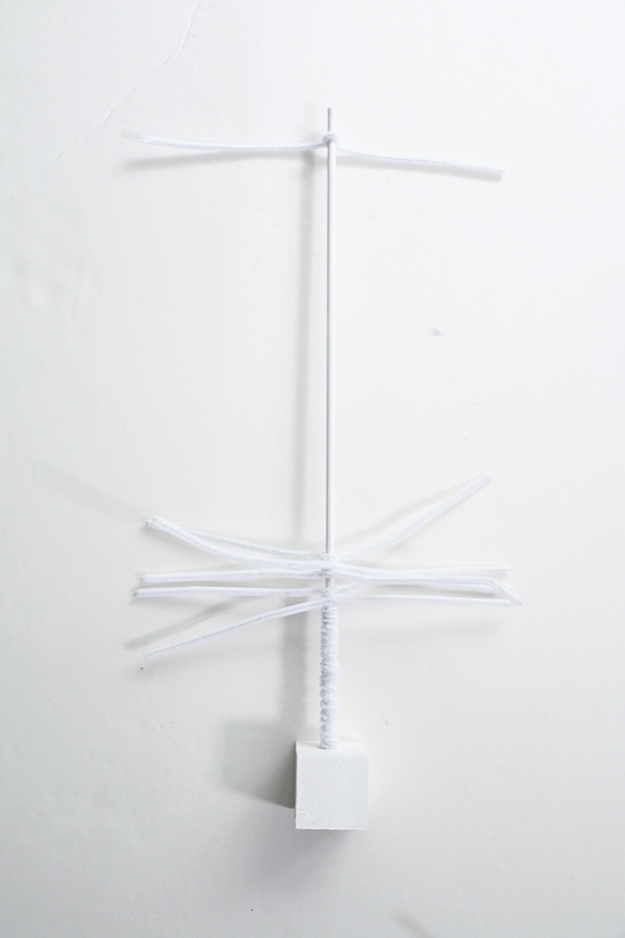
Step 3: Continue adding your pipe cleaners to your rod until it’s full.

IMG_3476

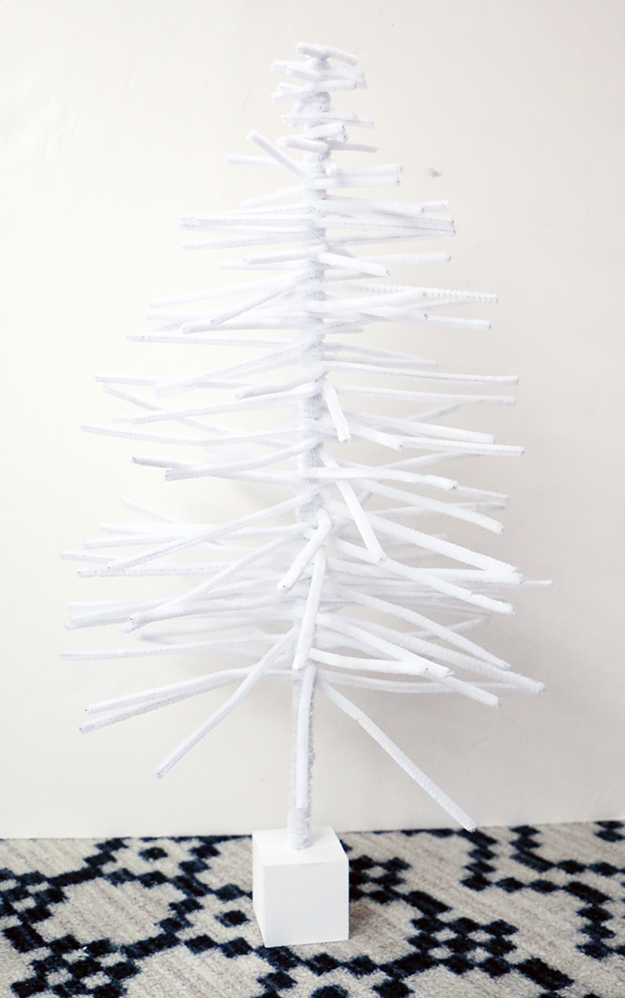
Step 4: Press your pipe cleaner so they are flat.  Use your scissors to trim them into a Christmas tree shape with the longest pipe cleaners at the bottom and the smallest at the top.

IMG_3480

Step 5: Fluff your pipe cleansers and arrange them to fill in the shape of your roulette tree.

IMG_3483

Step 6: To make the ornaments, push a eye pin through the bottom of a pom pom.  trim the wire down to 1/8 inch.  Then, use your pliers to bend the wire into a hook.

IMG_3728

Dec 14, 2017 | Post by: Meghan No Comments

Festive Holiday Letter Board

Letter boards are having a major moment right now.  I keep seeing them all over Instagram and in the stores.  So, naturally I have been convinced I also need one. So funny how that happens.  I started having letter board FOMO!

IMG_3747

I was lucky to find a letter board (on sale!) at Michael’s for $7.  Whoop!  It was like it was meant to be.  I grabbed that baby so fast and was super pumped to get it home and start playing with it.  Obviously the holidays are upon us so the debut of my new letter board had to be festive.  I arranged my letters in a sorta-circle shape to give it a little more character.  When I was finished arranging them, I felt like my board needed something else.   (more…)

  • Follow on Bloglovin
  • Categories

  • Archives

  • Press

  • Recent Pins

    Chocolate Chickpea Brownies are a healthy alternative to regular brownies and are fudgy, chocolatey, and easy to make. They are made gluten free, dairy free and vegan....
    ...
    Healthy Turkey Meatballs in Tomato Sauce | Ambitious Kitchen...
    ...
    An easy Cinco de Mayo Fiesta from @sweetphi...
    DIY Flower Crown : Flower Girl & First Communion - YouTube...
    ...
    ...
    ...
    Sourdough Morning Glory Muffins - Little Spoon Farm...
    Sourdough Discard Little Bites - Acts Of Sourdough...
    ...
    these healthy brownies are going to blow your mind✨ *dairy-free, gluten-free, vegan ingredients: 1.5 cups cooked sweet potato 1/2 cup almond butter 1/4 cup almond flour 1/4 cup cocoa 1/2 cup maple syrup 1 tbsp (coconut, olive, macadamia) 1 tsp vanilla 1/4 tsp baking soda 1/4 tsp baking powder pinch of salt 1/2 cup vegan chocolate chips (plus more for sprinkling on top) how to: 1. Preheat oven to 350 F. 2. Mix all ingredients together in baking bowl. 3. Stir in chocolate chips. Pour into 9x...
    ...
    These fluffy sourdough pancakes are super simple to whip up with just a few basic ingredients. Light and fluffy with a little bit of crispiness, it is easy to see why this recipe is our favorite. Add toppings like blueberries or chocolate chips to make an extra special weekend morning treat. #farmbouseonboone #sourdoughpancakes #pancakes #sourdough...