
I have been busy, busy, busy around our new house! From trying to organize all of our belonging, to painting the crap out of anything and everything that has a surface!
Speaking of painting, I have found a new obsession that is Chalk Paint. Not the kind you buy, but the kind you make yourself (obviously!). This stuff is pretty much magical. It allows you to paint wood furniture without sanding it. Oh, and the best part is, if you end up hating the color you picked (guilty as charged) you can paint right over it without any sort of sanding! Can you see why I am obsessed?!?
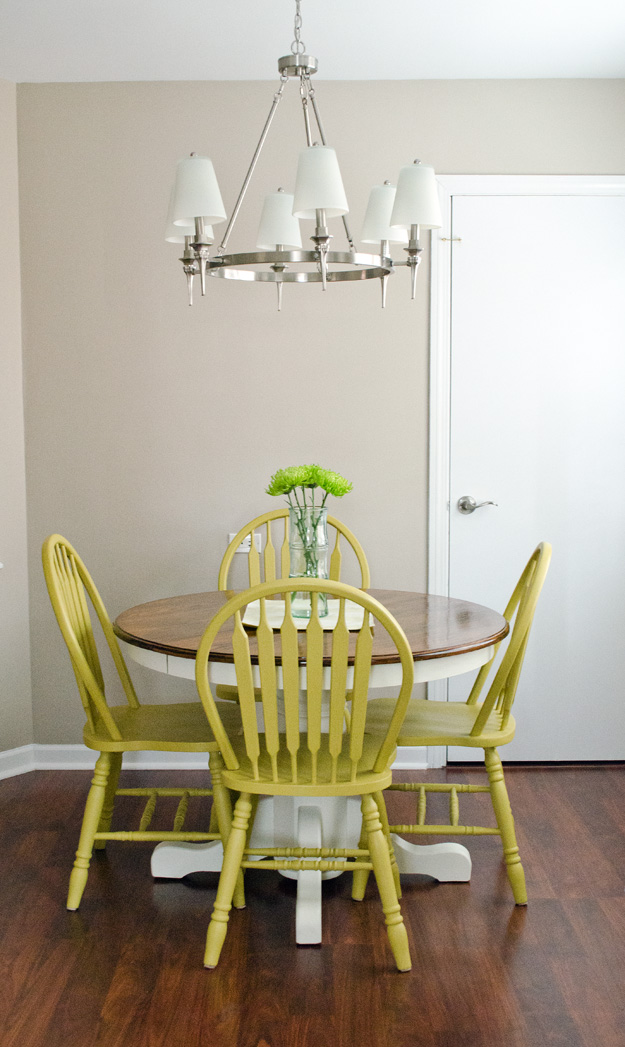
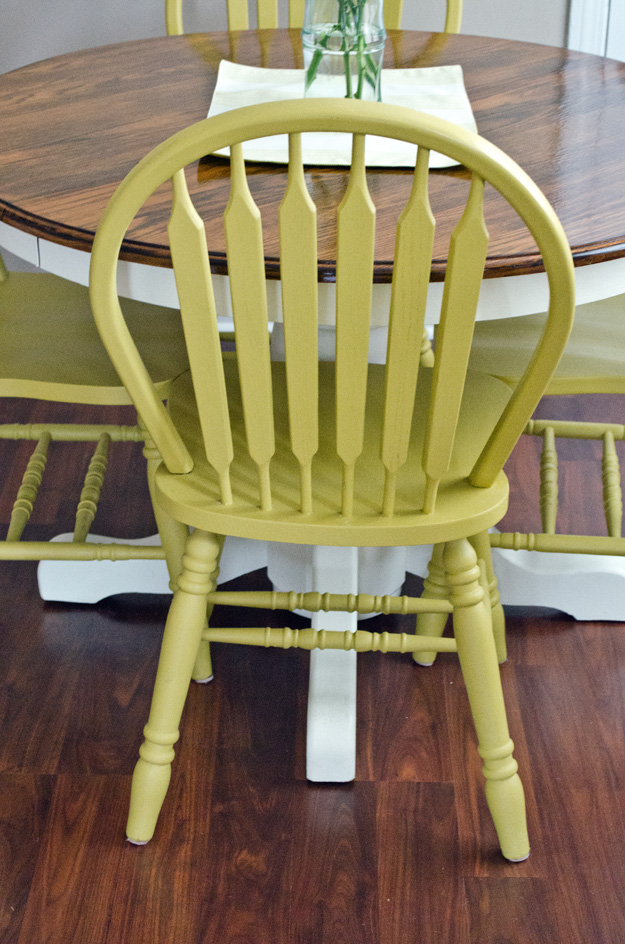
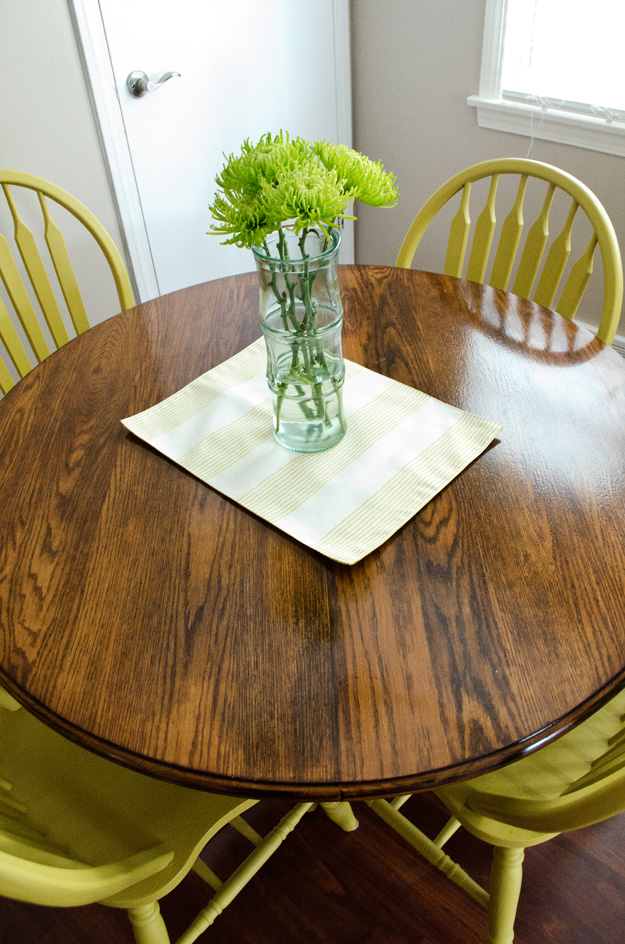
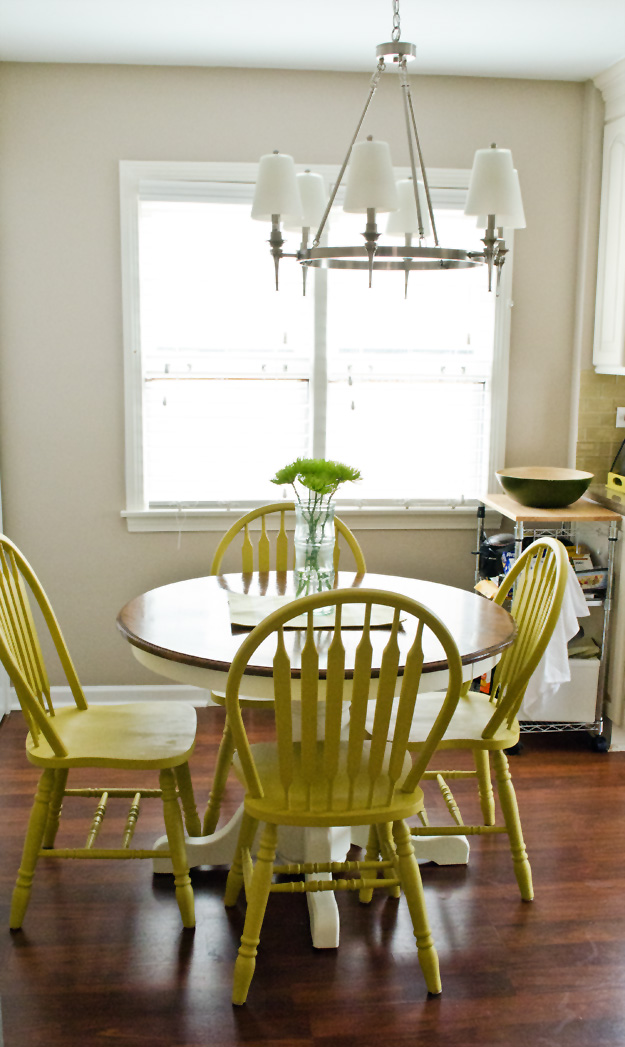
First up, for my chalk paint experiment, was a lovely oak kitchen table that fits perfectly in my kitchen (Thanks Beth & Tony for the donation! :D) . I loved the oak color, but thought my kitchen could use a little pop of color. I found a fabric swatch that had a pretty Chartreuse color on it that I thought would work well in my kitchen. So, I took the swatch to Home Depot and had them color match it. The color was spot-on! I was thinking of painting my chairs AND my table this color but decided against doing the table. I didn’t want to give anyone a stroke from the intense Chartreuse color! So…I decided to refinish the top of my table and paint the base an off-white color.
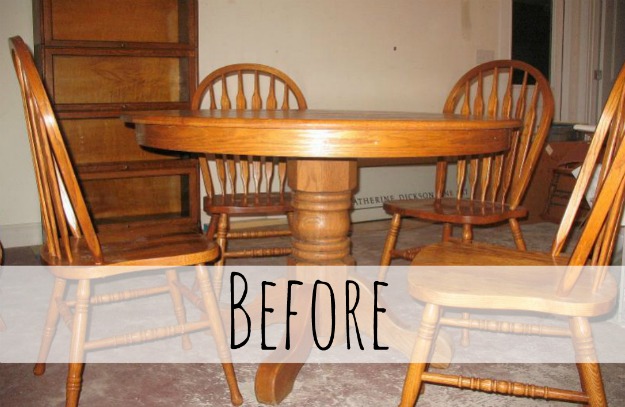
I took pictures of my table before it underwent its transformation, but I recently got a new phone and lost the pictures. With the help of Google, I was able to find an image that looked identical to my table before I redid it. This was my first time ever painting and refinishing furniture. Thanks to my mom, Marcia, for walking me through the process! It took some patience (which I rarely have), but I am super happy with the outcome of my project. I now have a ton of other projects that involve chalk paint-no surface is safe!
Have you ever used chalk paint? Did you have a positive experience with it?
Supplies Needed For Chalk Paint:
– Semi Gloss Paint
– Plaster of Paris
– Tablespoon
– Plastic cup
– Plastic Spoon
– Water
Supplies Needed to Refinish the Top of Your Table:
– Wood Stain
– Paint Brush
– Varnish
– Furniture Wax
– Steel Wool
– Sander and Sandpaper
– Rags
– Plastic Gloves
To Paint your chairs and bottom of your table:
Step 1: Wipe down all of the areas you are going to paint to remove any dirt or dust.
Step 2: I used the Chalk Paint instructions from this video, and they worked like a charm!
Step 3: I did 2 coats of paint on both the base of table and all of my chairs. Once everything is dry, you are going to go over your table base and chairs with your finishing wax. After you let it set for a few minutes, wipe it off with a rag (this will help protect your furniture). I also added new felt floor protector pads to the bottom of my chairs.

Step 1: To refinish your table, you will start with sanding it down. After you have sanded it down and it is nice and smooth, wipe it down with a wet rag to remove an dust.
Step 2: Start painting on your stain. Paint it on, then wipe it off. I ended up doing about 5 coats of stain to get my desired color.
Step 3: Once your stain has dried, take your varnish and brush on a think layer. Let this dry close to 24 hours. Once it is COMPLETELY dry, rub steel wool all over your table getting it nice and smooth. Apply another coat of vanish. I did four coats of varnish. The last coat, I did not use my steel wool. I left it nice and shiny.


August 28, 2014 7:37 am
Love it Meghan, really pretty and cute.
September 6, 2014 11:34 am
Hi, I was just wondering how much you X’s the paint amount by to have enough to paint the table and chairs? I watched the video and it was a really small amount.
September 8, 2014 1:30 pm
Hi Alissa!
I bought two samples of each color. I used one sample for each batch of paint I made. I followed the instructions on the video. I would have only needed one paint sample for my table. Since I completed the project in two days, I needed another sample because my paint had hardened!
September 16, 2014 12:12 pm
What a great color on those chairs, Meghan. I was thinking of doing something similar on my bar stools, but you’ve just convinced me.
September 16, 2014 8:33 pm
Yay! I would love to see your final product! :)
Meghan
Pingback: DIY:Roughed Up Vases - Happiness is...Creating
September 18, 2014 3:01 pm
so awesome, can’t believe it!
i will absolutely try this after my exams are done!
http://graail.com
October 11, 2014 3:59 pm
Do you think this would work on cabinets?
November 18, 2014 10:01 pm
Any suggestions on brushes to use? I am getting ready to chalk paint my oak chairs. I have never been a good painter and I am nervous about how to get the places like where the seat and back meet. Lots of spindles!
December 7, 2014 8:58 pm
What is the name of the chartreuse color?!?!
December 7, 2014 9:00 pm
Also, What grade steel wool did you use?
January 3, 2015 2:08 pm
The video on youtube is gone. Any other videos you know of to make chalk paint?
January 23, 2015 8:26 pm
I found this tutorial helpful, http://athomewiththebarkers.com/homemade-chalk-finish-paint/#_a5y_p=1445219
January 24, 2015 7:41 pm
Thanks for sharing this helpful link, Melissa. What would we do without youtube! :)
Pingback: Easy Tray Makeover - Happiness is...Creating
January 23, 2015 8:24 pm
Love this! I want to refinish my kitchen table and am trying to convince my husband that our chairs should be a fun color. :)
January 24, 2015 7:44 pm
Thanks! Adding a pop of color to your chairs can really add life to your kitchen. The good thing is, if your hubby hates the color, you can easily repaint the chairs a more subdued color without any additional work!
February 4, 2015 1:12 pm
How have your chair seats held up? I’ve painted my table but I’ve been holding of on the chairs because I’m worried about the durability of the paint and/or ruining my guests pants lol
February 4, 2015 1:18 pm
They’ve held up really well! I haven’t noticed any paint chips or anything! No ruined pants here. :)
February 4, 2015 1:51 pm
Thank you, that is great to know!
Pingback: How To Decorate Your Post Grad Apartment - Porch.com
March 28, 2015 11:06 am
What a beautiful job. True inspiration!
March 28, 2015 1:26 pm
Love it!
What color did you use for the walls in your kitchen?
March 29, 2015 6:42 pm
I have this exact table that was my parents. I love it but it doesn’t go with what I’ve done with our new house, and I really don’t want to buy a new one! This totally sold me! I’m definitely going to do this to match my colors!! Thanks for the idea and directions!! :)
April 6, 2015 9:00 am
Did you sand the chairs before painting?
April 6, 2015 1:56 pm
Hi Lina, I did not sand the chairs or table before painting them. That’s the beauty of chalk paint!
April 19, 2015 3:09 pm
What color stain did you use?
April 20, 2015 7:24 am
I wanted the top to be a much darker color, so I went with a walnut stain. Hope this helps!
August 25, 2015 10:02 am
Do you have the specific name/brand of the stain?
April 22, 2015 2:06 pm
What color are the chairs?
June 10, 2015 6:59 am
Hi did you spray or brush paint on the chairs? I brush painted one chair a few years ago and what a pain painting around all the spindles! Your paint job looks so flawless what is your secret to painting the chairs?
October 21, 2015 7:10 pm
I have the same question, how did you get your spindles so perfect?
October 22, 2015 11:31 am
With a lot of patience! Ha! I used a smaller paint brush and just kept going around each spindle. I turned my chair as I went so I could see all of the angles to make sure I didn’t miss any spots! Hope this helps! :)
Pingback: Alley Treasure Find: Oak Coffee Table - Happiness is...Creating
October 15, 2015 3:31 pm
what is the name of the color of the chairs?? love it!
Pingback: 15 Stunning DIY Dining Table Makeovers - Little Red WindowLittle Red Window
Pingback: Chalk Paint per Ristrutturare mobili: 10 Tutorial | LUNAdei Creativi
Pingback: A Kitchen Table That Pops! – Happiness is…Creating | Iconic Form
June 9, 2016 8:08 am
Smart, looks fresh and very pretty! Well done to you!
Pingback: Before & After: A Plain Dining Set Pops - Tmarie Linens
Pingback: Before & After: A Plain Dining Set Pops – Sofia Consola
Pingback: Before & After: A Plain Dining Set Pops – Pioneers Discovers
Pingback: Before & After: A Plain Dining Set Pops | Property Soup
March 17, 2018 7:43 pm
What kind of garish did you use? This look amazing!
March 17, 2018 7:43 pm
I mean varnish!
March 23, 2018 7:39 am
Hi Monica,
I used a gloss polyurethane (like this one: http://amzn.to/2DPIUg2). Hope this helps! :)
Meghan
Pingback: 15 Stunning DIY Dining Table Makeovers - Little Red Window